Have you ever pulled up old flooring only to discover a stubborn layer of adhesive staring back at you? It’s frustrating, isn’t it? Remove adhesive from concrete floors is one of those home improvement challenges that can test your patience, but with the right approach, it’s absolutely doable. Whether you’re preparing your concrete for polishing, staining, or installing new flooring, getting rid of that sticky residue is essential. Let’s walk through everything you need to know to tackle this project like a pro.
Table of Contents
Understanding Concrete Floor Adhesives
Before you grab a scraper and start attacking that adhesive, it helps to understand what you’re dealing with. Not all adhesives are created equal, and knowing your enemy is half the battle.
Types of Adhesives You’ll Encounter
Concrete floor adhesives come in several varieties, each with its own personality. Carpet adhesive tends to be thick and rubbery, often leaving behind a black or brown residue. Tile adhesive or thinset is cement-based and incredibly stubborn—it basically becomes part of the concrete. VCT (vinyl composition tile) adhesive is usually a yellowish or amber color and can be somewhat brittle when old. Then there’s general construction adhesive, which might have been used for various purposes and varies widely in composition. Each type responds differently to removal methods, so identifying what you’re working with can save you tons of time and effort.
Why Adhesive Removal Can Be Challenging
Here’s the thing about concrete and adhesive: they form a bond that’s designed to last decades. Concrete is porous, which means adhesive doesn’t just sit on top—it seeps into those tiny pores and grabs hold. Over time, this bond can actually strengthen as the adhesive cures and hardens. Additionally, some older adhesives contain materials that make them particularly resistant to removal. It’s like trying to separate two pieces of paper that have been glued together and left to dry for years. Patience and the right technique are your best friends here.
Safety First: Preparing for Adhesive Removal
Let’s talk safety before we dive into the fun stuff. Adhesive removal isn’t just messy—it can be hazardous if you’re not careful.
Essential Safety Equipment
You absolutely need proper protection for this job. Safety glasses or goggles are non-negotiable—adhesive particles and chemical splashes can cause serious eye injuries. Heavy-duty gloves protect your hands from chemicals and prevent blisters from scraping. A respirator or N95 mask is crucial, especially when using chemical removers or creating dust through grinding. Knee pads will save your joints if you’re working on a large area, and closed-toe shoes protect your feet from dropped tools and chemical spills. Think of this equipment as your armor—don’t skip it!
Ventilation and Workspace Preparation
Good ventilation isn’t optional when working with adhesive removers. Open all windows and doors, and set up fans to create cross-ventilation. If you’re working in a basement with limited airflow, consider renting an industrial fan or air scrubber. Clear the area of anything you don’t want covered in adhesive residue or chemical overspray. Cover nearby surfaces with plastic sheeting, and create a clear path to carry tools and materials in and out. Trust me, your future self will thank you for taking these precautions.
Assessing Your Adhesive Situation
Not every adhesive removal job is the same. Taking time to evaluate your specific situation will help you choose the most effective method.
Age and Type of Adhesive
Older adhesives often become brittle and may actually be easier to remove than newer, more flexible ones. However, some vintage adhesives contain asbestos, which requires professional abatement—never attempt to remove suspected asbestos-containing materials yourself. Check when your building was constructed and what type of flooring was installed. Doing a small test in an inconspicuous area helps you gauge how the adhesive will respond to different removal methods without committing to one approach for the entire floor.
Size of the Affected Area
Are you dealing with a small bathroom or an entire warehouse? The scope of your project dramatically affects which method makes sense. For small areas (under 100 square feet), hand tools and chemical removers might be perfectly adequate. For larger spaces, you’ll want to consider renting mechanical equipment like floor scrapers or grinders. It’s the difference between using a butter knife to spread peanut butter on one slice of bread versus needing a commercial spreader for a hundred sandwiches—scale matters!
Method 1: Using Heat to Remove Adhesive
Heat is often the gentlest way to soften adhesive without introducing harsh chemicals. It works particularly well on certain types of glue.
Heat Gun Technique
A heat gun is like a supercharged hair dryer that can soften adhesive enough to scrape it away. Hold the heat gun about 6-8 inches from the surface and move it constantly to avoid scorching the adhesive or creating fumes. As the adhesive softens and becomes gooey, use a plastic scraper or putty knife to lift it away. Work in small sections, heating and scraping methodically. This method requires patience but gives you excellent control. Be aware that heating some adhesives can create unpleasant or potentially harmful fumes, so maintain good ventilation and take breaks if needed.
Boiling Water Method
For water-based adhesives, sometimes the simplest solution is the best. Boiling water can soften certain glues enough to make them scrapable. Pour boiling water over a small section and let it sit for a few minutes to penetrate the adhesive. Then scrape away the softened material. This method is particularly effective for carpet adhesive and some construction adhesives. The downside? It’s labor-intensive and creates a wet, slippery mess. You’ll need to work in manageable sections and have plenty of towels on hand. But hey, it’s cheap, non-toxic, and surprisingly effective for the right situations!
Method 2: Chemical Adhesive Removers
Sometimes you need to bring in the big chemical guns to dissolve stubborn adhesive.
Commercial Adhesive Removers
The market offers numerous adhesive removers specifically formulated for concrete floors. Products like Goo Gone Pro-Power, Sentinel 626, and Blue Bear are popular choices. These removers work by breaking down the molecular bonds in the adhesive, turning it from a solid into a gel or liquid that’s easier to remove. Apply the remover according to manufacturer instructions, usually spreading it over the adhesive and letting it sit for a specified time. The waiting period is crucial—don’t rush it! Once the adhesive has softened, scrape it away and clean the residue with water or the recommended neutralizer.
Natural and Eco-Friendly Alternatives
If you prefer to avoid harsh chemicals, several natural options can tackle lighter adhesive jobs. White vinegar is mildly acidic and can soften some water-based adhesives. Citrus-based solvents use natural orange oil to dissolve adhesive—they smell much better than petroleum-based products! Soy-based gel removers are biodegradable and work surprisingly well on many adhesives. While these options are gentler on you and the environment, they typically require more time and elbow grease. They’re perfect for small jobs or if you have chemical sensitivities. Think of them as the eco-warrior’s toolkit—they might take longer, but they get the job done responsibly.
Method 3: Mechanical Removal Techniques
When gentle methods don’t cut it, mechanical removal might be your answer. This is where you literally force the adhesive off the concrete.
Scraping Tools and Floor Scrapers
A good floor scraper is worth its weight in gold for adhesive removal. These tools feature a long handle and a sharp blade that lets you apply leverage while standing upright—saving your back and knees. For smaller areas, hand-held scrapers or putty knives work fine. The key is keeping your blades sharp. A dull blade will frustrate you endlessly, while a sharp one glides under adhesive like butter. You can rent heavy-duty walk-behind floor scrapers for large jobs. These machines let you apply significant force with less personal effort, making quick work of even stubborn adhesives.
Grinding and Sanding Options
For truly stubborn adhesive or when you need a perfectly smooth surface, grinding might be necessary. Angle grinders with diamond cup wheels can remove adhesive along with a thin layer of concrete, leaving a clean surface. This is aggressive but effective. For larger areas, renting a concrete floor grinder makes sense. These machines systematically grind away adhesive and surface concrete, preparing the floor for new treatments.
When to Use a Concrete Grinder
Concrete grinding is the nuclear option—use it when other methods have failed or when you need to level the floor anyway. It’s perfect for removing thick layers of multiple adhesive applications or when the adhesive has deeply penetrated the concrete. Grinders create massive amounts of dust, so proper dust control with a vacuum attachment is essential. This method permanently alters your concrete surface, removing the top layer. The result is a rough, exposed aggregate finish that’s perfect for coatings or new flooring installation. Consider grinding when you’re preparing for epoxy coating, polished concrete, or need to remove contaminants along with the adhesive.
Method 4: Solvent-Based Solutions
Solvents dissolve adhesive through chemical action, often working where other methods fail.
Mineral Spirits and Paint Thinner
Mineral spirits and paint thinner excel at dissolving petroleum-based adhesives. Pour or spread the solvent over the adhesive and let it penetrate for 10-15 minutes. The adhesive will begin to soften and can then be scraped away. These solvents are particularly effective on construction adhesive and some carpet glues. Work in well-ventilated areas and avoid open flames—these products are flammable. After scraping, you’ll need to clean the floor thoroughly to remove solvent residue before applying any new flooring or coatings.
Acetone for Stubborn Adhesives
Acetone is a powerful solvent that works on adhesives resistant to milder treatments. It’s the same stuff in nail polish remover but in higher concentrations. Acetone evaporates quickly, so you need to work fast. Apply it to the adhesive, let it work for just a few minutes, then scrape. The rapid evaporation means you might need multiple applications. Acetone is extremely flammable and produces strong fumes, so ventilation is critical. It’s also hard on skin, so gloves are a must. Reserve acetone for those really stubborn spots where nothing else has worked—it’s like the special forces of adhesive removal.
Removing Specific Types of Adhesive
Different adhesives require tailored approaches. Let’s break down strategies for the most common types.
Carpet Glue Removal
Carpet adhesive is probably the most common concrete floor adhesive you’ll encounter. It typically responds well to heat and scraping. Start with a heat gun to soften small sections, then scrape. For larger areas, chemical removers designed specifically for carpet glue are highly effective. The trick with carpet glue is that it often leaves a dark stain even after mechanical removal. If you’re staining or polishing your concrete, you might need to grind the surface to completely remove this discoloration. Patience is key—carpet glue comes off in layers, and you might need multiple passes to get down to clean concrete.
Tile Adhesive and Thinset
Thinset and tile adhesive are cement-based, making them particularly challenging. Chemical removers often don’t work well because the adhesive is similar to concrete itself. Your best bet is mechanical removal—chiseling, scraping, or grinding. A hammer drill with a chisel bit can break up thick layers of thinset. Follow up with grinding to smooth the surface. This is hard, physical work, but there’s really no shortcut. The good news? Once you remove thinset, your concrete underneath is usually in excellent condition because thinset actually protects it.
VCT and Vinyl Flooring Adhesive
VCT adhesive is often yellow or amber and can be quite stubborn. It responds well to chemical removers, particularly those containing solvents. These adhesives were often applied very thin, so you might have success with vigorous scraping alone. One technique that works well: apply adhesive remover, wait the recommended time, then use a floor buffer with a stripping pad. The combination of chemical action and mechanical agitation breaks up the adhesive effectively. Be aware that older VCT adhesive may contain asbestos, so if your floor was installed before 1980, get it tested before disturbing it.
Post-Removal Cleanup and Floor Care
You’ve removed the adhesive—congratulations! But you’re not quite done yet.
Neutralizing Chemical Residue
Any chemical removers or solvents you used need to be completely neutralized and removed before moving forward. Most chemical removers will have specific instructions for neutralization, often involving mopping with water or a mild alkaline solution. For solvent residue, washing with a degreaser followed by thorough rinsing works well. This step is crucial if you’re planning to apply any coatings, stains, or new adhesives—residual chemicals can interfere with bonding and curing. Think of it as washing your dishes after cooking; you wouldn’t put food on a dirty plate, and you shouldn’t put new flooring on chemically contaminated concrete.
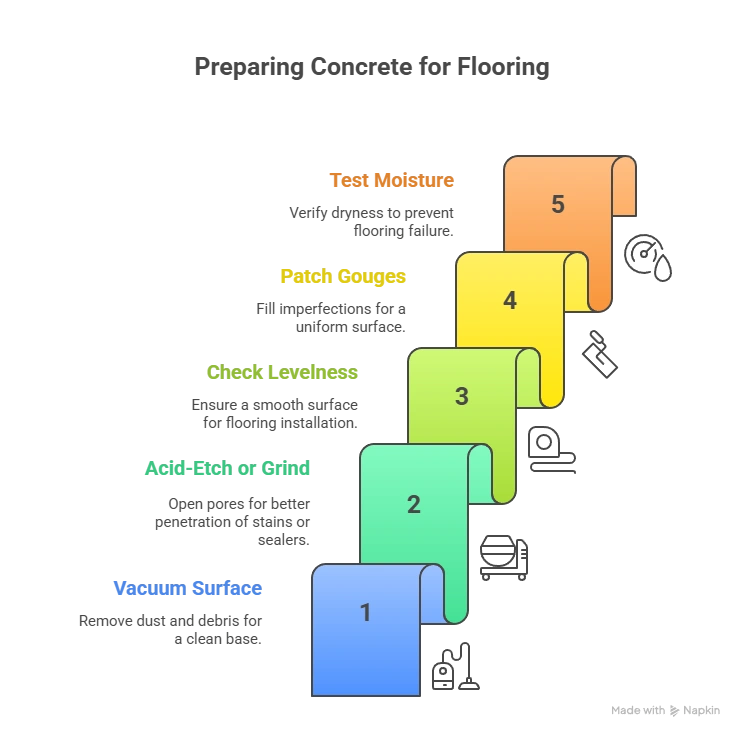
Preparing Concrete for New Flooring
Now that your concrete is adhesive-free, it needs proper preparation for whatever comes next. Vacuum thoroughly to remove all dust and debris. For staining or sealing, you might need to acid-etch or grind the surface to open the pores and ensure proper penetration. If you’re installing new flooring, check that the surface is level and smooth—fill any gouges or divots with concrete patch. Test the moisture level of your concrete, especially if you removed adhesive that was acting as a moisture barrier. Excess moisture can cause new flooring to fail. Taking time for proper preparation ensures your next flooring installation will be successful and long-lasting.
Common Mistakes to Avoid
Learn from others’ mistakes so you don’t have to make them yourself! One major error is using too much force with scrapers and damaging the concrete surface underneath. Be firm but controlled. Another mistake is not testing your removal method in a small area first—what works great on one type of adhesive might damage another area or prove ineffective.
Many people also underestimate the time required and try to rush the process, leading to poor results and frustration. Don’t mix different chemical removers thinking you’ll get better results—this can create dangerous reactions. Finally, skipping proper safety equipment seems like a time-saver until you end up with chemical burns or breathing problems. Take your time, follow instructions, and prioritize safety over speed.
When to Call a Professional
Sometimes DIY isn’t the right answer. If your project involves more than a few hundred square feet, professional equipment and expertise will save you time and potentially money. Suspected asbestos-containing adhesive absolutely requires professional abatement—this isn’t negotiable.
If you’ve tried multiple methods without success, professionals have access to industrial-strength removers and equipment you can’t easily rent. Time constraints matter too—if you need the job done quickly for a renovation deadline, pros can accomplish in hours what might take you days. Finally, if the concrete surface needs to be pristine for high-end polishing or specialty coatings, professional preparation ensures the best results. There’s no shame in calling in experts when the job demands it.
Conclusion
Removing adhesive from concrete floors is rarely fun, but it’s absolutely achievable with the right approach and tools. Whether you choose heat, chemicals, mechanical methods, or a combination of techniques, success comes down to patience, proper safety precautions, and matching your method to your specific adhesive type.
Start with the gentlest method that might work, and escalate as needed. Remember that proper preparation and cleanup are just as important as the removal itself. With the knowledge you’ve gained here, you’re ready to tackle that sticky situation and reveal the beautiful concrete floor hiding underneath. Roll up your sleeves, gear up for safety, and get to work—you’ve got this!
Read Also: How To Use Neem Oil On Citrus Trees The Ultimate Guide
FAQs
Q1: Can I use a pressure washer to remove adhesive from concrete? Pressure washers can help with some water-based adhesives but aren’t effective for most floor adhesives and can actually drive adhesive deeper into concrete pores. They work best as a cleanup tool after you’ve already removed the bulk of the adhesive through scraping or chemical methods. The mess they create indoors usually isn’t worth the minimal benefit.
Q2: How long do chemical adhesive removers need to sit before scraping? Dwell time varies by product and adhesive type, typically ranging from 15 minutes to several hours. Always follow the manufacturer’s instructions—leaving remover on too long can dry out and become ineffective, while not waiting long enough means the adhesive won’t be properly softened. For thick adhesive layers, you might need to apply multiple treatments.
Q3: Will removing adhesive damage my concrete floor? Proper removal techniques shouldn’t significantly damage concrete, though aggressive grinding will remove a thin surface layer. The bigger risk is using metal scrapers too forcefully, which can gouge the surface. Using sharp tools at the correct angle and appropriate pressure protects your concrete while still removing adhesive effectively.
Q4: Can I install new flooring over old adhesive residue? This depends on your new flooring type. Some installations require perfectly clean concrete for proper adhesion, while others are more forgiving. Thin residue films might be acceptable under some floating floors, but any new glue-down installation needs completely clean concrete. When in doubt, remove it all—starting with a clean slate prevents future flooring failures.
Q5: What’s the easiest type of floor adhesive to remove? Water-based carpet adhesive is generally the easiest to remove, especially when it’s relatively fresh. It responds well to heat, water, and scraping. The most difficult are old, petroleum-based adhesives and cement-based thinset. Age also matters—very old adhesive often becomes brittle and easier to scrape, while moderately aged adhesive can be stubbornly flexible and clingy.